How To Screenshot On HP Laptop?
- 1 Steps On How To Screenshot On HP Laptop?
- 1.1 Option 1: Applying the Print Screen Method
- 1.2 Option 2: Make Use Of The Screensketch Tool
- 1.3 Option 3: Snip & Sketch for selective screenshotting
- 1.4 Option 4: Use the Snipping Tool
- 1.5 Option 5 – Better features with Super Screenshot
- 2 How to take pictures on an HP tablet
- 3 What You Need to Know About Laptop Screenshots?
- 4 Conclusion
- 4.1 FAQs
- 4.1.1 Q1. How do I take a picture on a Windows laptop?
- 4.1.2 Q2: How do I take a picture on a Mac laptop?
- 4.1.3 Q3: Where do I save my screenshots?
- 4.1.4 Q4: Can I change my photos right away?
- 4.1.5 Q5: How do I take a picture of just one window?
- 4.1.6 Q6: Is there an outside tool for taking screenshots?
- 4.1.7 Q7: How do I make a picture that scrolls?
- 4.1.8 Q8: Can I take a screenshot on my PC during a video call?
Screengrabs, screencaps, or screenshots—whatever you want to call them—this method lets me take a picture of my computer background. Screenshotting is very helpful for me; whether I’m at work showing my coworkers changes I made to a blog or on a holiday Skype call with my family across the country, I want to take a picture of them. It lets me save those times as picture files without leaving the screen.
HP® is one of the world’s biggest computer companies and keeps taking significant steps to make computers more straightforward. I’ll show you how to take pictures of your desktop in many different ways, from pressing a few keys on your computer to using screen-casting software. By the way, some of these methods were taken from WindowsFixHub.com so make sure to visit them for more ‘how to’ guides for Windows.
Steps On How To Screenshot On HP Laptop?
Option 1: Applying the Print Screen Method
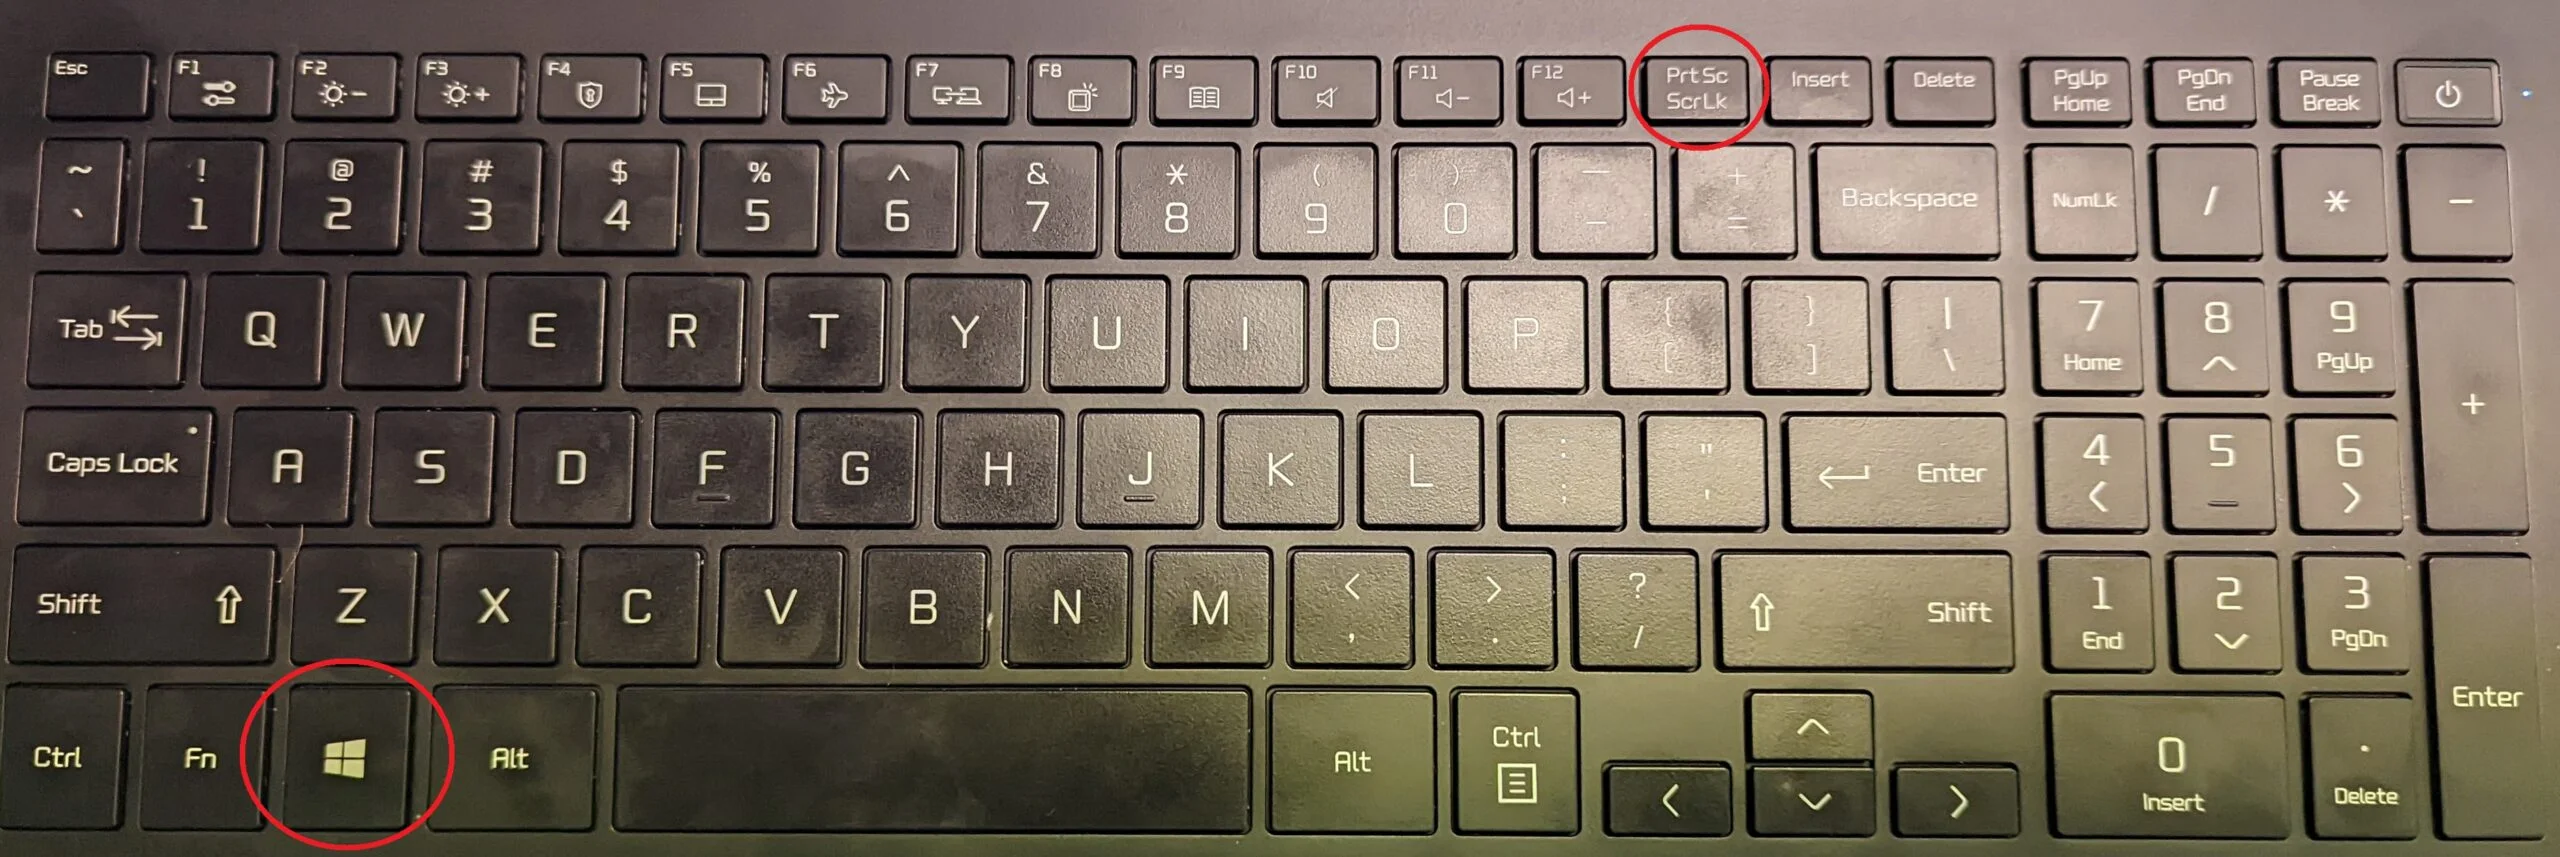
- Start the Capture: Start by depressing the Windows key. Press the “PrtSc” (Print Screen) key once as you hold it. Your first step in grabbing what shows on your screen is this basic one.
- Confirmation of Capture: Your screen will dim momentarily after you tap these keys. Based on this dimming, your laptop has effectively captured a screenshot of your entire screen.
- Finding Your Snapshot: Your snapshot immediately saves itself as captured in the “Screenshots” folder. Your “Pictures” library contains this folder within. Just navigate to this folder to see and utilize your screenshots as needed.
Option 2: Make Use Of The Screensketch Tool
- Depress the Windows key first. Press the Windows key, then tap the W key. This will cause the right side of your screen to show a sidebar menu.
- From the sidebar menu, hunt out and choose “ScreenSketch.” Not only can this utility capture your screen, but it also lets you mark or draw straight on the picture.
- Once in ScreenSketch, you may change the image in your screenshot. Notes, sketches on it, or highlights of key passages straight within the tool can be added by you.
- Remember to save your altered picture following any intended alterations. Usually placed at the top of the ScreenSketch window, the ‘Save’ button can be clicked. To save the screenshot for future use, decide on your desired file format and location.
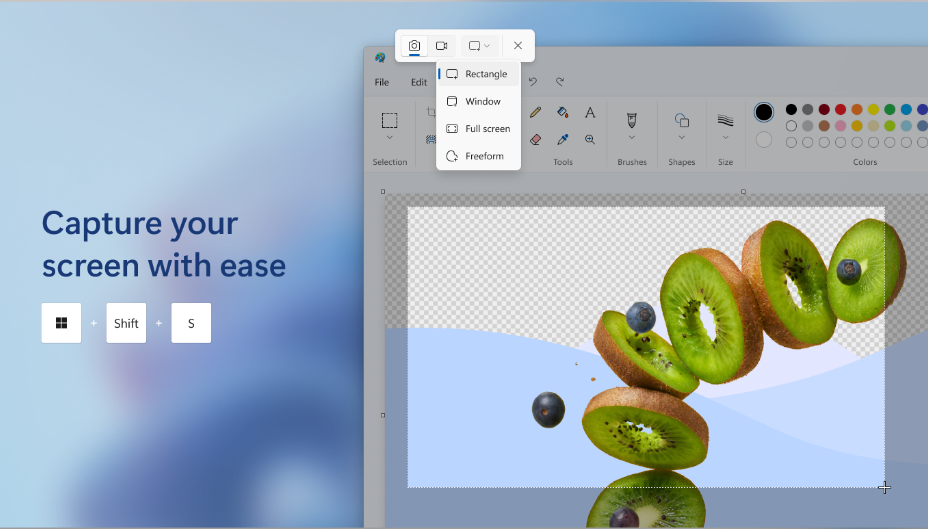
Option 3: Snip & Sketch for selective screenshotting
- Press the Windows key plus shift immediately to start the snip. Your pointer will switch to a crosshair, indicating that you are ready to choose, while your screen will fade to a white overlay.
- To choose the area of the screen you wish to photograph, click and drag the crosshair. The chosen bit will vanish from your screen and copy itself automatically to your clipboard upon releasing the mouse button.
- Open an image editing tool, make a fresh image, then paste your screenshot with Ctrl + V. Save your work as a JPG or PNG file somewhere you will find easy-going forward.
Option 4: Use the Snipping Tool
- You can find the Snipping Tool in the Start menu. Once the capture is open, click “New” or press Ctrl + N to start a new one.
- To pick the area you want to photograph, click and drag the crosshair cursor to make a rectangle outline.
- Then, in the Snipping Tool menu, click the disc icon to save the picture as a PNG or JPEG file.
The Snipping Tool also has a lot of different modes and other features.
- Free-form Snip lets you take screenshots in any shape, like circles, ovals, or even figure eights.
- Your current window can be grabbed with just one click.
- Full-screen snip records everything you see on your screens, which is excellent for setups with two monitors.
- You can note your pictures in the Snipping Tool with the built-in pen and highlighter.
Option 5 – Better features with Super Screenshot
- Once the software is downloaded, run it and pick the type of record you want (image or video).
- Pick out the part of your screen you want to photograph. Once the image is captured, it will appear in the Super Screenshot program and be ready for further editing.
- Use the program’s tools to blur, enlarge, or add notes to your picture. If you want to send your finished picture to other people easily, click the “quick share” button.
Screenshots are a must-have for keeping important memories alive, whether of your show tickets, a business document, or a particular text message exchange. With these methods, getting precisely what you need is easy and quick.
How to take pictures on an HP tablet
Taking screenshots on a PC or laptop differs from taking screenshots on an HP tablet running Windows or Android.
Hold down the power and volume buttons simultaneously for about two seconds. The flash on the screen lets you know that the screenshot was taken.
Please look at the picture: Go to your tablet’s photo area to find the image you took and look at it.
What You Need to Know About Laptop Screenshots?
Screenshots are a must-have tool for laptop users that can be used in several scenarios. This is mainly why I take screenshots: to keep records and check my work. Screenshots save mistakes, confirmations of transactions, or other significant events on your screen to be used as visual records of many operations. This visual information is beneficial for getting expert help or showing proof of activities that went well or poorly.
Photos are also beneficial for sharing information effectively. In the classroom or the office, visual aids help people explain challenging details, steps, or directions. Screenshots make it easy to gather and send necessary information quickly and ensure everyone understands what is being said.
Keeping records is another vital trait; this is where screenshots come in handy. They let users save data from web pages, papers, and other on-screen data that could be changed or deleted later. It benefits researchers, reporters, and anyone who wants to save data or proof for later use.
Take pictures of everything that is written in manuals and tutorials. They make it possible for people to follow steps visually and help make training materials that are complete and easy to understand. This method makes learning new tools much easier, as well as understanding how things work or following troubleshooting steps.
A lot of review notes and criticism are based on screenshots as well. When reviewing programs, websites, or tools, mentioning specific areas of interest or worry lets you make complete and correct comments. Visual feedback is often more helpful than verbal comments because it makes the problems or features stand out more clearly.
Screenshots are often used to record and share design work, develop new ideas, and make advertising materials in the creative and marketing fields. They allow quick visual contact, which makes it easier for teams to work together and get better results.
Conclusion
Screenshots are a valuable and flexible tool for computers, making documenting, communicating, and being creative much easier. When you want to record your screen for personal, educational, or business reasons, it’s essential that it’s easy to do so. Learning the different tools and methods to take screenshots will significantly improve the output and clarity of graphic data distribution. Windows and Mac have good built-in options for taking pictures, and many third-party programs offer even more advanced tools to meet specific user needs. Screenshots are essential to modern computers because they let users easily save, share, and use visual information in various situations.
FAQs
Q1. How do I take a picture on a Windows laptop?
If you press the “PrtScn” button on a Windows machine, the whole screen will be copied to the clipboard. Pressing “Windows + Shift + S” brings up the Snipping Tool, which gives you more options and lets you grab a specific part of the screen.
Q2: How do I take a picture on a Mac laptop?
If you press “Command + Shift + 3,” the whole Mac screen will be taken up. Press “Command + Shift + 4” to select an area. This will change the mouse to a crosshair, which lets you pick your desired area.
Q3: Where do I save my screenshots?
When using “PrtScn” to take a picture on Windows, the image is copied to the clipboard. A screenshot made with “Windows + PrtScn” is saved in the “Screenshots” folder under the “Pictures” directory. Screenshots on a Mac are saved to the desktop by default.
Q4: Can I change my photos right away?
Mac and Windows come with tools that let you change screenshots immediately after they are taken. On a Mac, you can use Preview to make quick changes. On Windows, you can use the Snip & Sketch tool.
Q5: How do I take a picture of just one window?
When you press “alt + PrtScn” on Windows, you can grab the current window. On a Mac, pressing “Command + Shift + 4” and then “Spacebar” will make the mouse look like a camera, letting you click and grab the window you want.
Q6: Is there an outside tool for taking screenshots?
Many third-party apps can take and edit screenshots in very advanced ways. Snagit, Greenshot, and Lightshot are popular options that can do more than the built-in features on Windows and Mac.
Q7: How do I make a picture that scrolls?
A moving screenshot is possible with third-party apps like Snagit or the Awesome Screenshot browser add-on. With these programs, you can record long web pages or papers beyond the screen.
Q8: Can I take a screenshot on my PC during a video call?
Yes, you can take photos during video chats using the usual methods. To protect privacy and secrecy, ensure you have permission to record and share what’s said on a call.